How To Export a Reify App and Import Into an Existing SmartClient App

In part one of this guide, we built a screen in Reify that was a complete mini-application. Now we will walk through the steps of exporting that application and importing into the existing SmartClient application.
The application had many advanced features, including all CRUD operations and database actions, sizing, sorting, validations, and workflows.
Below is the complete XML source for that application. Look at how short it is and how easy to understand!
create-app-and-export
<isomorphicXML>

<DataSource loadParents="true" loadID="supplyCategory,supplyItem"/>

<TreeGrid loadDataOnDemand="false" dataSource="supplyCategory" autoFetchData="true" autoID="supplyCategoryTreeGrid">
    <fields>
        <TreeGridField type="text" name="categoryName" title="Item"/>
    </fields>
    <nodeClick>
            <Action target="supplyItemGrid" name="fetchRelatedData" mapping="node,viewer"/>
    </nodeClick>
</TreeGrid>

<ListGrid dataSource="supplyItem" autoFetchData="true" autoID="supplyItemGrid">
    <fields>
        <ListGridField name="itemName"/>
        <ListGridField name="SKU"/>
        <ListGridField name="description"/>
        <ListGridField name="category"/>
        <ListGridField name="units"/>
        <ListGridField name="unitCost"/>
        <ListGridField name="inStock"/>
        <ListGridField name="nextShipment"/>
    </fields>
    <showFilterEditor>true</showFilterEditor>
    <canRemoveRecords>true</canRemoveRecords>
    <recordClick>
            <Action target="supplyItemForm" name="editSelectedData" mapping="viewer"/>
    </recordClick>
</ListGrid>

<DynamicForm dataSource="supplyItem" autoID="supplyItemForm">
    <fields>
        <TextItem name="itemName" title="Item"/>
        <TextItem name="SKU" title="SKU"/>
        <TextAreaItem name="description"/>
        <TextItem name="category"/>
        <SelectItem name="units"/>
        <FloatItem name="unitCost"/>
        <CheckboxItem name="inStock"/>
        <TextItem name="nextShipment"/>
        <ButtonItem title="Save" autoName="saveButton" endRow="false">
            <click>
                    <Process autoStart="false">
                        <sequence>
                            <FormSaveDataTask componentId="supplyItemForm"/>
                            <ShowNotificationTask message="Record Added/Updated Succesfully"/>
                            <FormClearValuesTask componentId="supplyItemForm"/>
                        </sequence>
                    </Process>
            </click>
        </ButtonItem>
        <ButtonItem title="Add New" autoName="addNewButton" startRow="false">
            <click>
                    <Action target="supplyItemForm" name="editNewRecord" mapping="form"/>
            </click>
        </ButtonItem>
    </fields>
</DynamicForm>

<TriplePane autoNavigate="true" ID="triplePane">
    <navigationPane ref="supplyCategoryTreeGrid"/>
    <listPane ref="supplyItemGrid"/>
    <detailPane ref="supplyItemForm"/>
</TriplePane>

<DataView overflow="hidden" autoID="mainScreen" width="100%" height="100%">
    <members>
        <Canvas ref="triplePane"/>
    </members>
</DataView>

</isomorphicXML>Code language: HTML, XML (xml)
Now, let’s export this project from Reify and put it into your existing SmartClient application.
We will be using Maven to import our project from Reify.
To find out how to set up Maven with SmartClient, take a look at our blog post on Installing and Using SmartClient with Maven.
This blog assumes you have already set up Maven. We will now add the necessary configuration to Maven to get it ready for Reify imports.
First, extract the SmartClient runtime:
mvn packageThen, navigate to your Maven project’s main folder via a command line:
cd <the name of your Maven project repository main folder>Code language: DOS .bat (dos)Configure the Isomorphic Plugin for Maven by opening the pom.xml file in your main project folder and look for the configuration tags plugin
<groupId> com.isomorphic </groupId> section.
Change the following:
<configuration>
   <dataSourcesDir>WEB-INF/ds/isomorphic</dataSourcesDir>
   <serverId>add a name for your server</serverId>
   <serverUrl>https://create.reify.com/</serverUrl>
</configuration>Code language: HTML, XML (xml)
Add external server credentials to your local Maven configuration e.g. settings.xml (you will need administrator access to do this).
Note: This step will only need to be performed once.
Also, please make sure the name chosen in server matches the name you selected in your pom.xml file.
open <path to Maven>/conf/settings.xml

<?xml version="1.0" encoding="utf-8"?>
<settings xmlns="http://maven.apache.org/SETTINGS/1.0.0" xmlns:xsi="http://www.w3.org/2001/XMLSchema-instance"
      xsi:schemaLocation="http://maven.apache.org/SETTINGS/1.0.0 https://maven.apache.org/xsd/settings-1.0.0.xsd">

   <servers>
      <server>
         <id>add a name for your server</id>
         <username>your Reify User Name</username>
         <password>your Reify User Password</password>
      </server>
   </servers>
</settings>		Code language: HTML, XML (xml)
Now we are ready to Import the project using our reify-import method. It is important to note that the Maven repository and the name of the project in your Reify environment need to match for this to work correctly:
mvn com.isomorphic:isc-maven-plugin:1.4.3:reify-importCode language: CSS (css)Edit src/main/webapp/js/createexport.js and replace any code there with your Reify project details (as shown below):
isc.RPCManager.loadProject('create-app-and-export');Code language: JavaScript (javascript)
Start Jetty:
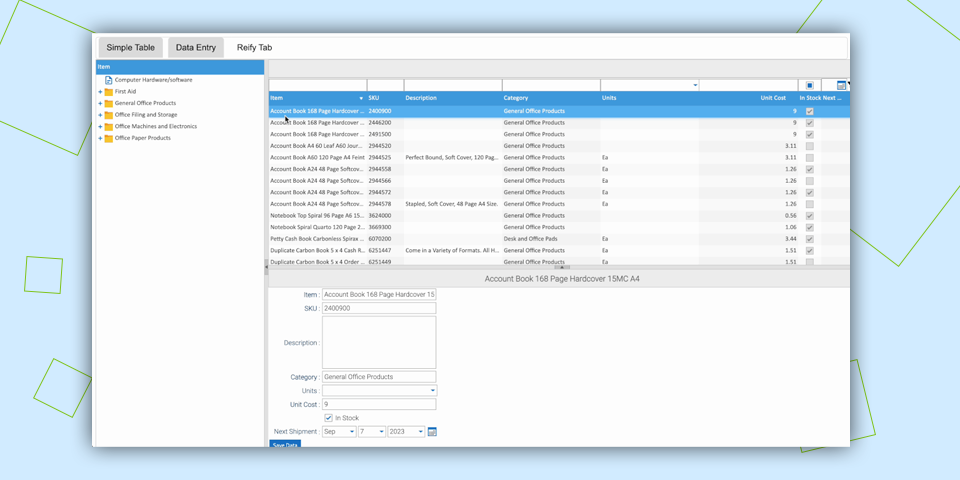
mvn jetty:runCode language: CSS (css)Now run your application (http://localhost:8080/create-app-and-export/index.jsp) and see that the loaded screen just uses the pre-existing SmartClient SQL DataSources, and not the MockDataSources that the screen was built with in Reify.
This is because the CSV files we used in Part 1 to create the DataSource definitions in Reify were originally derived from the DataSources in the sample Maven project, and that’s why things line up perfectly.
This is the standard way Reify is intended to be used with an existing SmartClient project. Namely, use SmartClient to export DataSource definitions into Reify (via the Admin or Developer Console), have designers work with those DataSources in Reify, so that the exported Reify screens will just automatically connect to the original DataSources when added to the existing SmartClient application.
And that’s it!!!
In these few short steps, we have managed to export the code, place it into your existing Maven repository and have everything work with all CRUD operations working seamlessly with your pre-existing database tables and DataSource definitions.
Get a demo of Reify
Experience a live demonstration of the Reify low-code platform customized to your specific needs!